Craft CMS on Nanobox: Part 1 – Local Development
Craft 3 on Nanobox
In this article we will explore starting a new Craft 3 project with Nanobox local development environment as well as getting an existing Craft 3 project running locally with Nanobox.
Check out the previous article in case you need to get familiar with Nanobox.
Starting a new Craft 3 project
You will not believe how easy it can be to start a brand new Craft 3 project with Nanobox (you need to have Nanobox installed on your local machine). Turns out that after a bit of research and experimentation, it is possible to have a fully functioning Craft 3 local development environment with just 1 command! (unless you count the other 2 commands ;-)
# create a new project directory and cd in
mkdir nanobox-craft3 && cd $_

# add a local DNS entry to easily access the new Craft 3 site
nanobox dns add local nanobox-craft3.test

# run the Craft 3 local development bootstrap
bash <(curl -sL https://git.io/fpPHA)
The above code will do the following:
- Create and configure a new instance of Nanobox environment
- Install and configure PHP 7.1 with all necessary extensions
- Install and configure PHP-FPM
- Install and configure Nginx server
- Install Composer to manage all PHP dependencies
- Install and configure MySQL Database server
- Create and configure a new Craft CMS 3 project
At the end of the installation process, you will be prompted to finalize the Craft configuration by accessing the Control Panel in your browser using the automatically assigned IP address. However, you can use the local domain we added earlier as well: http://nanobox-craft3.test/admin
If you're interested in what's actually going on 'under the hood', you can review the boxfile.yml, installation scripts and supporting files in the nanobox-craft3 repository on GitHub.
Setting up an existing Craft 3 project
You don't have to start a brand new Craft 3 project if you want to take advantage of local development with Nanobox. It is a little bit more involved to get your existing Craft 3 project setup and running locally on Nanobox. The following steps should result in a working local development environment or at least get you very close (depending on specific requirements of your existing project). For the purposes of this article, we will assume a vanilla Craft 3 project with the following requirements:
- PHP 7.1
- All necessary PHP extensions for Craft to work properly
- Nginx webserver
- PHP-FPM as application server
- MySQL as a database backend
Include the boxfile.yml with your codebase
As the first step, add the Nanobox boxfile.yml in the base directory of your Craft 3 project. This file delineates the instructions necessary to build the hosting environment for your particular project. A large portion of the boxfile.yml will remain the same from project to project and from developer to developer. However, varying project requirements will most certainly result in a slight variation of the boxfile.yml among different Craft 3 projects. For example, if you choose to utilize a Postgres database instead of the more 'traditional' MySQL your boxfile.yml will need to reflect this choice.
The boxfile.yml for a vanilla Craft 3 project would look something like this:
run.config:
  engine: php
  engine.config:
    runtime: php-7.1
    extensions:
      - ctype
      - curl
      - fileinfo
      - imagick
      - iconv
      - json
      - mbstring
      - pdo
      - pdo_mysql
      - session
      - simplexml
      - zip
      - intl
      - dom
    allow_url_fopen: 'On'
    default_locale: 'en_US'
    error_reporting: 'E_ALL'
    post_max_size: '20M'
    upload_max_filesize: '20M'
    composer_install: 'composer install --no-interaction --prefer-dist --optimize-autoloader'

    webserver: 'nginx'
    document_root: web
    nginx_index_list:
      - index.php
      - index.html
    nginx_default_gateway: index.php

  extra_steps:
    - cp nanobox/nginx.conf /data/etc/nginx/nginx.conf
  build_triggers:
    - nginx.conf

	extra_packages:
    - mysql-client-5.6.39

  cache_dirs:
    - vendor

deploy.config:
  transform:
    - |
      if [ "$APP_NAME" = "sim" ]; then
        sed -i -e "s/\"dev\"/\"staging\"/g" .env
      else
      	sed -i -e "s/\"dev\"/\"production\"/g" .env
      fi

web.craft:
  start: php-server
  network_dirs:
    data.storage:
      - storage
      - web/cpresources
  writable_dirs:
    - config
  log_watch:
    craft[stacktrace]: /app/storage/logs/web.log
    craft[error]: /app/storage/logs/phperrors.log
    php[error]: /data/var/log/php/php_error.log
    php[fpm]: /data/var/log/php-fpm.log

data.db:
  image: nanobox/mysql:5.6

data.storage:
  image: nanobox/unfs:0.9
Before you can build the local environment, there are a couple additional steps.
Add necessary configuration files
Create nanobox directory in the base project directory and copy the nginx.conf configuration file into it.
Open your config/db.php configuration file and adjust it to look something like this:
<?php
/**
 * Database Configuration
 *
 * All of your system's database connection settings go in here. You can see a
 * list of the available settings in vendor/craftcms/cms/src/config/DbConfig.php.
 *
 * @see craft\config\DbConfig
 */

return [
    'driver' => getenv('DB_DRIVER'),
    'server' => $_ENV['DATA_DB_HOST'],
    'user' => $_ENV['DATA_DB_USER'],
    'password' => $_ENV['DATA_DB_PASS'],
    'database' => 'gonano',
    'schema' => getenv('DB_SCHEMA'),
    'tablePrefix' => getenv('DB_TABLE_PREFIX'),
    'port' => getenv('DB_PORT')
];
Note that we're setting the database connection credentials to values provided by Nanobox using the $_ENV array. The remaining values still come from the .env file which we will need to setup next. You can adjust your existing .env file or use the following version. You will need to specify the SECURITY_KEY environment variable.
Build the development environment and start the server
At this point, we're ready to build the Nanobox local development environment, but first, let's add a local DNS entry to simplify accessing your app in a browser (it's totally up to you what you name your local domain, however, I recommend using the .test TLD to keep things simple).
nanobox dns add local my-craft3.test
Now, we're all set to get the Nanobox local development environment going.
nanobox run php-server
When the build process is complete, Nanobox will automatically start the web server and you can access your website at http://my-craft3.test or whatever local domain you setup in the previous step.
Don't be alarmed that your website is not working and you'll actually see an HTTP 503 – Service Unavailable error. This is because the website database is completely empty. We will need to import your existing data into the DB first.
Import your database data
To import your database data, you'll first need to export the existing database. You can use the built-in Craft 3 database export feature at Control Panel > Utilities > Database Backup (make sure to leave the 'Download backup?' option checked) or export the database into an SQL file any way you choose. Save the file somewhere you can easily get to.
Next, open a new terminal window or tab and run the following command to list the Nanobox local development environment info.
nanobox info local
The listing will look something like this.
----------------------------------
my-craft3 (dev)              Status: up
----------------------------------

Mount Path: /Users/macuser/Sites/Nanobox/my-craft3
Env IP: 172.21.0.23

data.db
  IP      : 172.21.0.24
  User(s) :
    root - fgbSJ7kTkn
    nanobox - JsQ3zD4IjY

data.storage
  IP      : 172.21.0.25
  User(s) :
    gonano - LBNwBv3uMg

Environment Variables
  APP_NAME = dev
  DATA_DB_HOST = 172.21.0.24
  DATA_STORAGE_USER = gonano
  DATA_STORAGE_USERS = gonano
  DATA_DB_NANOBOX_PASS = JsQ3zD4IjY
  DATA_DB_PASS = JsQ3zD4IjY
  DATA_DB_ROOT_PASS = fgbSJ7kTkn
  DATA_DB_USER = nanobox
  DATA_DB_USERS = root nanobox
  DATA_STORAGE_GONANO_PASS = LBNwBv3uMg
  DATA_STORAGE_HOST = 172.21.0.25
  DATA_STORAGE_PASS = LBNwBv3uMg

DNS Aliases
  my-craft3.test
If you have the mysql client installed on your local machine, you can use it to import your database.
mysql -h 172.21.0.24 -u nanobox --password=JsQ3zD4IjY gonano < ~/Downloads/db_export.sql
A template command would look something like this. Substitute the values from the nanobox infol local command for the curly-brace delineated variables in the command below.
mysql -h {DATA_DB_HOST} -u nanobox --password={DATA_DB_PASS} gonano < {path_to_your_database_export_file}.sql
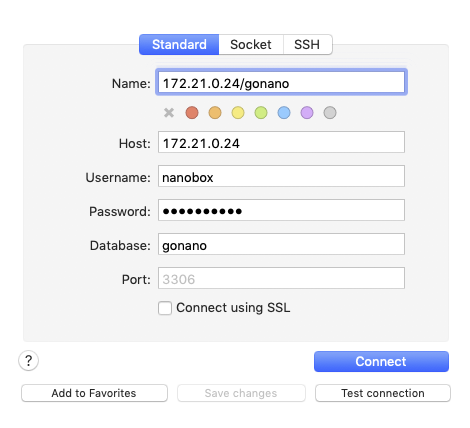
In case you don't have the mysql client installed or you prefer to work with a GUI based database tool, you can do the same. Here is an example of connecting to your database using SequelPro on Mac.
Your existing Craft 3 project is now running on Nanobox
And there you have it. Now your existing Craft 3 project is running in a Nanobox local development environment. You can access your website front-end at http://my-craft3.test and your Control Panel at http://my-craft3.test/admin.
The base directory of your app is automatically mounted into Nanobox, so any changes will be reflected in your running app. Simply open that directory in your favorite code editor and keep working.
Remember that none of the software running your app is actually installed on your local machine, you need to drop into Nanobox console to interact with the development environment.
# drop into a Nanobox console
nanobox run

# list your installed packages
composer show

# require and install a new composer package
composer require vendor/package

# inspect the code mounted from your local machine
ls

# exit the console
exit
In the next article we will look at Staging your application locally with Nanobox in the DRY-RUN mode to get it ready for ultimately deploying it live.